中文译文
白色战团
白色战团是我的第三支,也是最新的一支战团。它以史上最伟大的佣兵团命名,这群乌合之众也没辱没这个名字:他们终结了贵族战争和绿皮危机,袭击了几处兽人基地,打败了军阀和他的手下。谢谢 Sarissofoi,你的楔形阵太棒了!到第 259 天,他们攻下了黑色巨石,既没有撤退,也没有损失一个人。不过,可怜的“神射手”托恩赫尔姆丢了鼻子。
我的本职工作是教师,所以总忍不住把事情尽量讲透。大概是积习难改吧。
战团配置
前期战团:
游戏前期,别急着惦记史诗战利品,也别忙着袭击兽人战营、地精城市或黑色巨石。你得先活下来,慢慢壮大战团,专心做小委托和贸易。随着实力增长,逐步组建下面这样的队伍:
- 2-4 名长柄武器与弓箭双修手。
尽量提高远程命中、先攻和远程防御;如果 还有余力,再兼顾近战命中,优先顺序如上。
- 4-5名持盾弟兄(负责承受伤害)
尽量提高近战防御、疲劳上限和近战命中。
- 2 名双手武器战士,负责侧翼与输出。
优先提高近战命中、疲劳上限和近战防御。
- 1名军士
意志必须高,疲劳上限不能低,远程防御也不可或缺。总之,祝你早日找到合适的人选;我的军士以前是个乞丐。
后期战团:
等你凑齐约 12 人,并且有了不错的护甲,前排护甲达到约 200 就是一个不错的节点,便可以开始向后期配置转型。
白色战团的后期阵容如下:
- 1名军士,必须携带战旗。
拿长柄武器很诱人,我自己也踩过这个坑,但战旗的意志加成实在不能舍弃。让他继续举旗,他不是来打输出的。
- 2名专职弓手
到了后期,50 点近战命中根本不够看,干脆放弃它,全力提高远程命中、先攻和远程防御。
- 2名持盾弟兄
其他人执行各自任务时,弓手和军士需要护卫。这些护卫在多数战斗里派不上什么用场,但高难度战斗中必不可少。
- 7 名双手武器手,后面有截图。
这些人是任何后期战团的中坚。高近战命中和防御让他们长久生存,300/300 的板甲配置用来抵挡箭矢和弩箭,极高的疲劳上限则让他们持续行动。
如何指挥这支战团作战
普通任务、伏击和委托中,直接向前推进,把敌人砍得血肉横飞。双手武器手之间留出 1 或 2 格,让他们能毫无阻碍地挥击。
遇到较难的任务或兽人战营,可以试试楔形阵,也就是形状像 > 的阵形。把弓手和军士放在中央,同时给双手武器手留出足够的挥击空间。
Sarissofoi 的这段视频是一个很好的示范:https://www.youtube.com/watch?v=mxsrPluqLec&t=392s
黑色巨石的打法,我会单独开一章,配上截图。
你是谁,你负责什么?
各个角色的分工应该已经很清楚了,不过还是逐一说说吧!
- 持盾弟兄:标准防御单位,没有突出的长处或短板,就是用盾牌和单手武器保护弟兄的人。游戏后期,他们最有用的工作是挡住射向弓手的火线,帮助弓手活下来。
- 军士:后排支援。他不是来近战或打输出的,而是负责稳住士气。
- 弓手兼长柄武器手:游戏前期的弓手很弱,而且是非常弱。因此,把他们放到前排后面,用长柄武器戳人是个不错的办法。不过到了后期,这种打法就没什么意义了。
- 专职弓手:游戏后期的弓手射术精湛,很少失手。尽可能多给敌人造成伤势。他们当然能杀敌,但主要任务是致残敌人或让敌人溃逃。
- 双手武器手:真正负责杀敌的是这些人。弓手先削弱或打伤敌人,给他们创造击杀后触发狂战的机会,就能又快又轻松地横扫战场。
持盾弟兄
如前所述,这些人负责保护队友。
- 属性:招募新人时,重点看近战防御、疲劳上限和近战命中;如果还能有一点基础远程防御就更好了。照片里这位已经在战团待了 260 天,也就是说,他第 1 天就加入了!!!
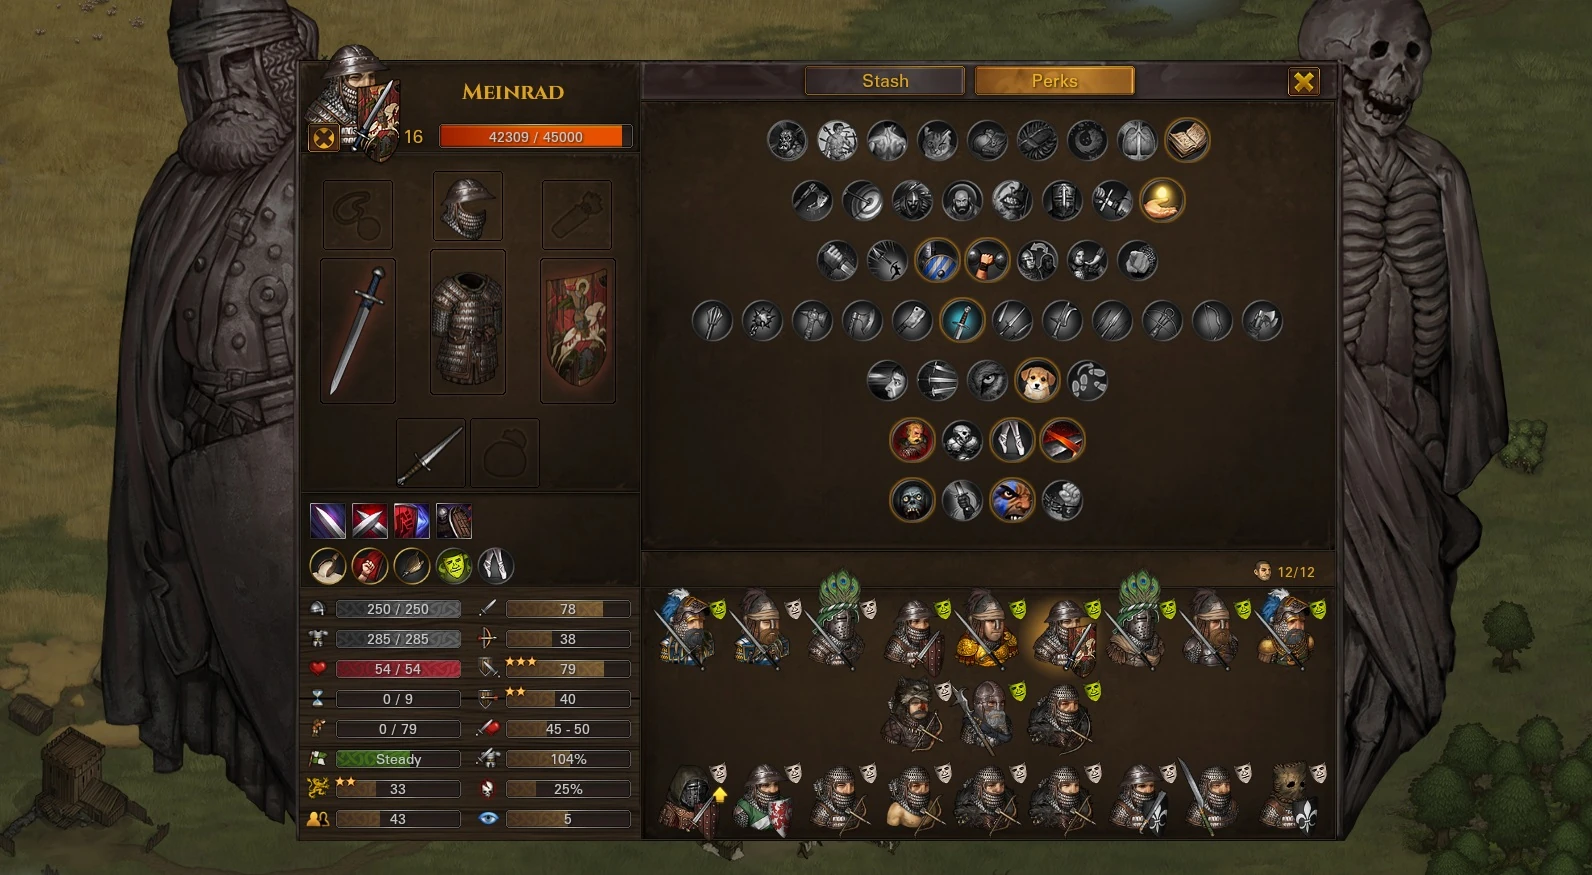

- 特长(附说明):
- 好学是个很棒的特长:经验获得更快,到了 11 级还会返还特长点。简直是天赐之物,想都不用想。
- 天赋异禀:属性按最高成长值增加,是很好的前期提升。反正这一层也没有更好的选择。
- 盾牌精通:他可是“持盾”弟兄。我就不多说了。
- 壮硕:除了弓手,人人都该有。留出更多可用疲劳,才能在战斗中多挥几下武器。
- 剑术精通:剑自带命中加成,所以我前期选了剑。当然,你喜欢什么就选什么。
- 以少敌多:被包围是佣兵生活的常态。选了它,你就不会那么容易死。
- 狂战:每次击杀后能多打一下,绝对是个好选择。这里也可以选轻灵,不过狂战对付地精尤其好用。
- 轻灵:我不会让这些人冲入敌阵,而是让他们保护弓手。有轻灵和高防御,他们几乎不会死,因为按当时的机制,剩余可用疲劳越多,轻灵的加成就越大。他们只是在弓手身边闲着打牌,所以轻灵始终能发挥作用。
- 久经战阵:护甲越厚,受到的伤害越少。选就对了,不用犹豫。
- 威慑:老实说,要是早知道这些,我会选寻路者。不过它在艰难的战斗里仍有帮助,尤其是打兽人时。
- 杀戮狂热:其实也没什么别的选择。他们从不丢下盾牌冲锋,不屈消耗的疲劳又太多。轻灵也仍然是个选项,毕竟这些人偏重防御。不过再说一次,杀戮狂热对付地精很好用。
- 可选特长(本人尚未测试):
- 用寻路者替代威慑。正如上文所说,要是早知道这些,我多半会这么选。
- 用钢铁额骨替代杀戮狂热,免得再被爆头。
- 用挑衅替代狂战或轻灵。营救弓手时,它可能非常管用。不过我没亲自试过。
- 用换位替代轻灵或狂战,理由同上。
长柄弓手与狙击手
这些人不一定要当杀戮机器。他们负责狙击优先目标,再打残敌人、逼其溃逃,也负责削弱敌人,让其他人靠击杀触发额外行动。
- 属性:招募弓手时,重点看远程命中、先攻和疲劳上限。远程防御高当然好,但不算必需,因为有持盾弟兄替他们挡着。
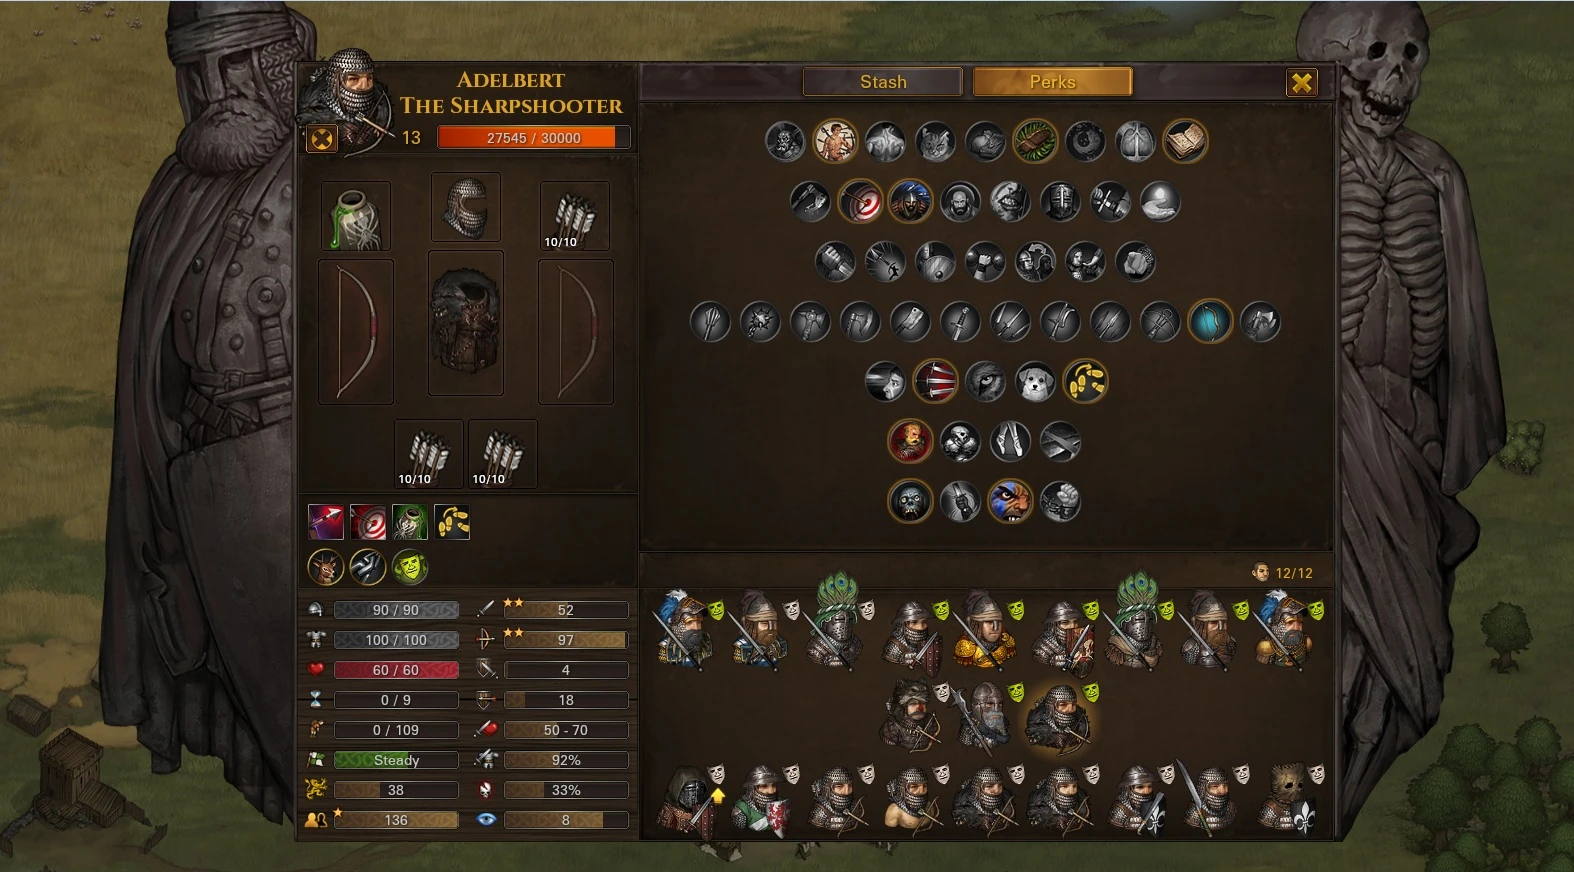

- 特长(附说明):
- 好学。见上文。
- 寻路者:尽快占领高地,并在逃离敌人时保留足够的行动点,是个不错的选择。
- 致残打击:如前所述,能让越多敌人受伤越好。敌人和你的弟兄一样,受伤后可能在这场战斗里完全失去作用。
- 鹰眼:真正值得打残或狙杀的目标,通常躲在他们自己的持盾弟兄后面。这时它就特别好用,而且也能降低误中己方弟兄的概率。
- 闪避:把当前先攻的 15% 转化为近战和远程防御加成。这个人有 136 点先攻,也就是 +20 点近战和远程防御。太棒了!
- 弓术精通:弓,弓,还是弓!!!弩的单发伤害的确更高,也有其他优点,但你真正想要的是每回合射两箭,再结合威慑、致残打击和压制。后面会讲。
- 压制:很棒的特长。如果敌人在你之后行动,每射一箭,无论命中还是落空,都能让其近战命中和远程命中 -10%(原文误写为防御)。只要提高先攻,你“总能”先出手,让敌人的作战能力 -20%。
- 灵活步法:你偶尔也会犯错,偶尔也会被击退。这时迅速退开一步,脱离近战,再把战线重新组织起来。
- 狂战:对付地精尤其神。多射一箭,就多一次击杀或致伤机会,最少也能多叠一层压制。
- 威慑:让他们逃吧!雇主可没要求你杀光每一个敌人。留一两个活口,让他们回去讲那些专吃不听话小孩的恶人的故事。把敌人吓跑,传奇就是这样诞生的!此外,这还会降低敌人的作战能力;敌人逃跑时,弟兄们也能趁机多打几下。
- 杀戮狂热:击杀后增加伤害。我确实喜欢它,但也在想快手会不会更好。大多数战斗我连一整袋箭都射不完,最难的战斗却会打空。在那种每个回合、每次射击都重要的战斗里,快手或许有用。
- 可选特长:
- 用快手替代杀戮狂热,原因如上。
军——士!
军士不该负责打架。和所有好上司一样,他们发号施令很在行,亲自执行却很糟。我知道你们有些人会心有戚戚,哈哈。
- 属性:这个人就是来稳住士气的,仅此而已。别掉进长柄武器的陷阱,拿战旗享受额外意志。为了稳住军心,他需要高得离谱的意志;到了后期,还要有相当高的疲劳上限和远程防御,因为他绝不应该近战。
不要照搬图中的属性!!!这个人被我练歪了,我正在培养新的军士。以后会修改这一页。
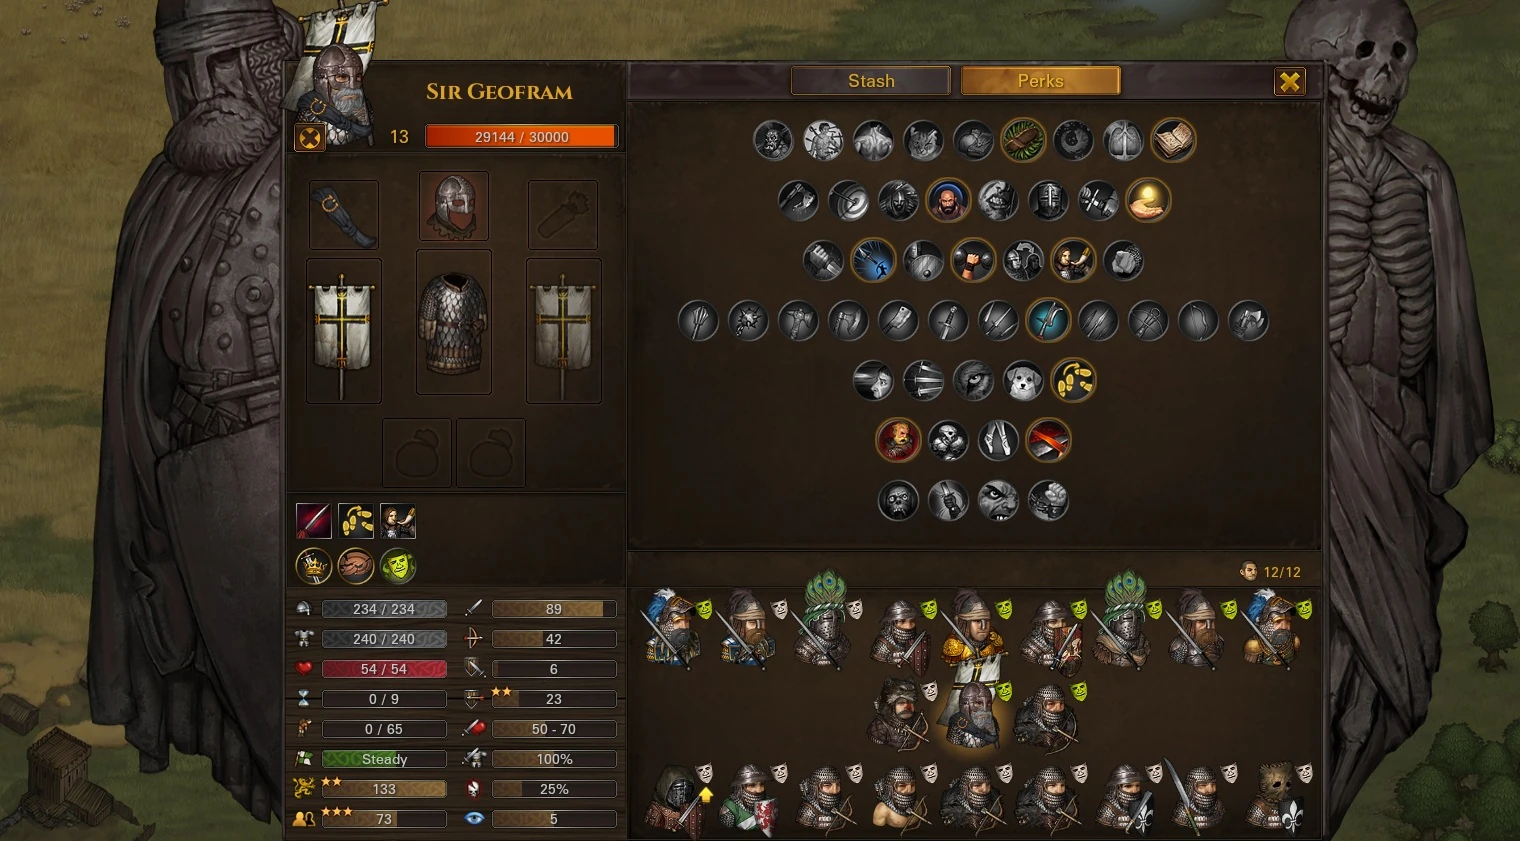

- 特长:
- 好学。参见持盾者部分。
- 寻路者:更快赶到需要帮助的队友身边,用鼓舞稳住他们。
- 坚定心智:主属性就是意志,它能额外增加 25% 意志。还用说吗?
- 天赋异禀:最高属性成长。太棒了,意志又能提高!
- 预判:敌人越远,你获得的远程防御越多。保命很好用。
- 壮硕:给他穿上重甲,确保他不会死;有壮硕,也不会那么容易累。
- 重振士气:这个特长才让军士成为军士。如果连它都没有,就不配扛旗。
- 长柄武器精通:为什么不呢?!不过我也许会把它换成巨人体魄之类的特长。没什么比军士阵亡更糟。
- 灵活步法:如果敌人逼近军士,可以肯定两件事:1. 你肯定在什么地方犯错了;2. 必须尽快把他救出去。
- 狂战:这个人确实被我练歪了。狂战完全没用,至少按我的用法如此,虽然配点不是这么回事。我可能会把它换成轻灵。
- 久经战阵:既然穿了重甲,就让他少受点伤。这个人绝对不能死,无论如何都不能。
- 可选特长:
- 军士太严肃,可不会给你什么选择。“叫你干什么就干什么,不然老子扒了你的皮,你这个他妈的下贱、懒惰的胆小鬼!吼啊!”——“军士”吉奥弗拉姆爵士,2017 年四月。
双手武器猛男
这些人才是真正的猛人。他们是扛起战团重担的主力,到处打出大量范围伤害。试着让他们彼此间隔一两格,敌人挤进空隙后就会被打残、被屠杀。
注意看看图里这人的击杀数和入团天数。他的日均击杀还不是最高的;我选他展示,是因为他疲劳上限高,而且胡子帅。
- 属性:想砍下敌人的脑袋,就得有实力。你要找的是高近战命中、高疲劳上限和不错的近战防御。远程防御是加分项,但并非必需。
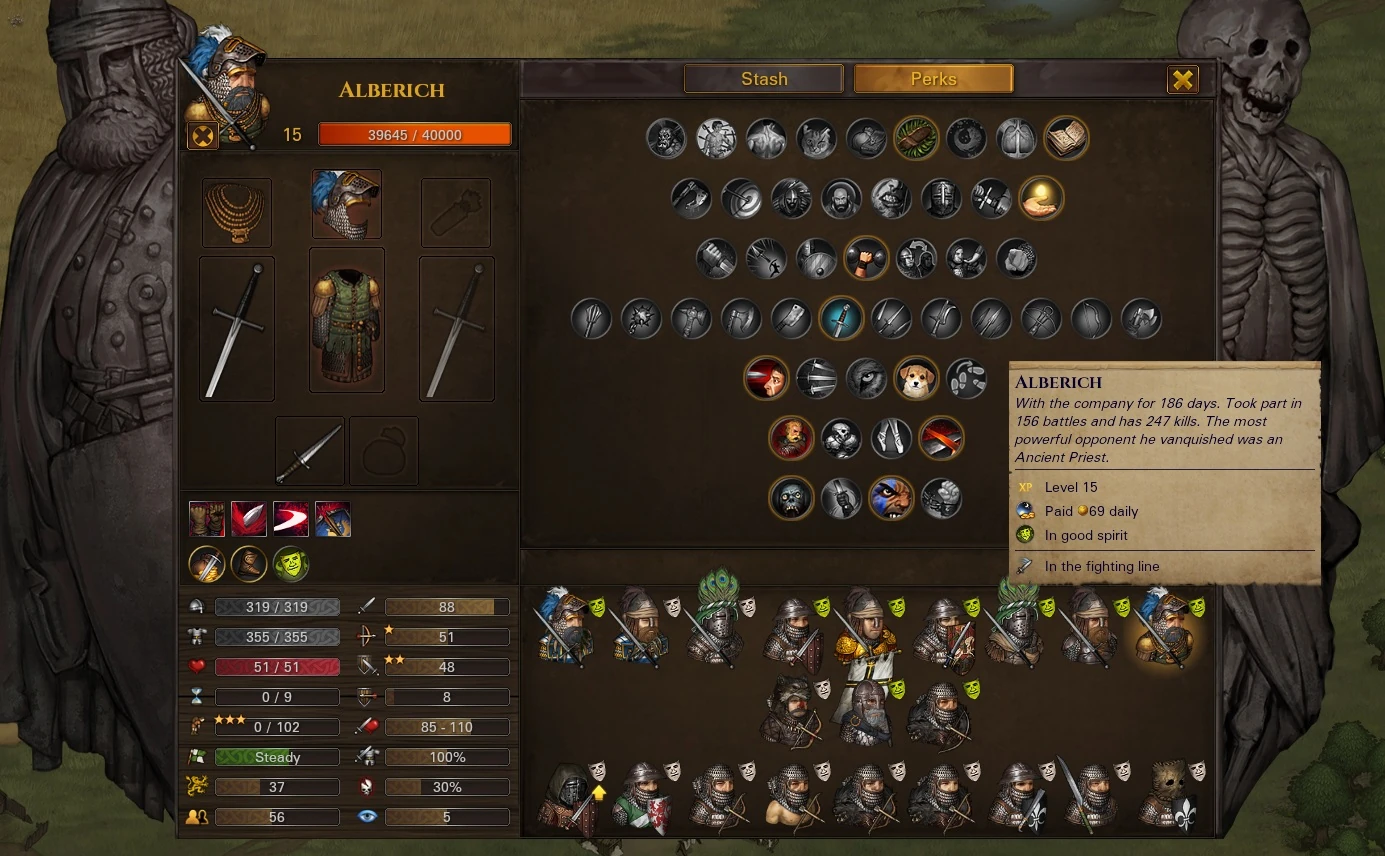

- 特长:
- 好学。无需多想,这是游戏里最好的特长。
- 寻路者:等你在沼泽或雪地打过仗就明白了。信我,选它。
- 天赋异禀:用最高成长值增加近战命中、疲劳上限和防御?别说了,特长点给你!如果你真的想进一步利用弓手打出的伤势,也可以换成刽子手,不过我还是会选它。
- 壮硕:必选。重甲确实很重,这个特长正好解决问题。
- 剑术精通:其实就是按所选武器点相应精通。不过我喜欢剑,它比其他双手武器轻,这项精通还增加命中率。而打中敌人非常重要,因为……
- 长兵优势:按当时的机制,每次命中增加一层长兵优势,每层使近战防御提高 20%,最多叠 6 层。实战中通常能有 3 层左右。这个人有 48 点近战防御,48 + 60% = 77。敌人很少能打中他。
- 以少敌多:记得吗,你不想挨打。以少敌多正好能帮忙,被包围不再带来防御惩罚,而且你本来就希望被包围。
- 狂战:触发时太棒了,弓手又能替它做好铺垫。每次击杀后,你基本都能再攻击一次。我认为这是个很棒的必选特长。
- 久经战阵:护甲越多,受到的伤害越少。你本来就很少被打中,真挨到一下,也像是敌人一拳打在砖墙上。太爽了!
- 杀戮狂热:击杀后,连续两回合额外造成 25% 伤害。而他本来就是来杀敌的,后期尤其值得选。
- 威慑:我喜欢让敌人逃跑,它很不错,也很实用。不过队友阵亡对敌人的士气也有同样的效果,所以也许可以把它换成刽子手、钢铁额骨,甚至恢复体力。
- 可选特长:
- 刽子手可以进一步利用弓手造成的伤势,是个不错的选择。
- 钢铁额骨可以让他们几乎不怕头部伤害,不过老实说,我不会这么选。
- 恢复体力:面对亡灵大军,这个特长会非常出色。如果当时用它代替威慑,黑色巨石就会更容易一些,或者说没那么难,毕竟亡灵根本不会溃逃。
- 巨人体魄:你很少被打中,挨打时伤害也不大。但如果还能几乎不受伤呢?对双手武器手来说,巨人体魄大致就是这个作用。
装备:
别光着身子打架,基本就这么回事。
认真说来,装备选择其实很直接。
持盾弟兄:重甲、头盔、自选武器和盾牌。鸢形盾更适合对付地精,熨斗形盾则更适合日常使用。备用武器要带匕首。
弓手:轻甲,加上不影响视野的头盔。培养几个裁缝,我前期有 4 个,他们迟早会做出狼皮甲,这就够用了。还有弓,弓,还是弓!弓比弩好用得多;不过前期弩更好,因为它有额外命中加成。
军士:重甲、战旗、重型头盔。绝不要让他近战,但万一陷进去了,必须活下来。
双手武器猛男:重甲、重型头盔,能有重型内裤也来一条。再带上自选双手武器,靠范围攻击赢得胜利。备用武器要带匕首。
(该死的)黑色巨石
黑色巨石是大后期可以挑战的地点,能拿到一件漂亮得不行的装备。前提是你能从 47 个亡灵手里活下来:其中有 4 个祭司,会范围恐惧和范围毒雾;还有几个吸血鬼,我记得大概是 6-8 个,以及多得离谱、身披重甲、手持塔盾的古代卫士。
我已经介绍了如何用白色战团取得胜利,不过这次攻坚值得更深入地讲解。
下面是通关且无人阵亡的截图证明:
1. 战前。第259天。
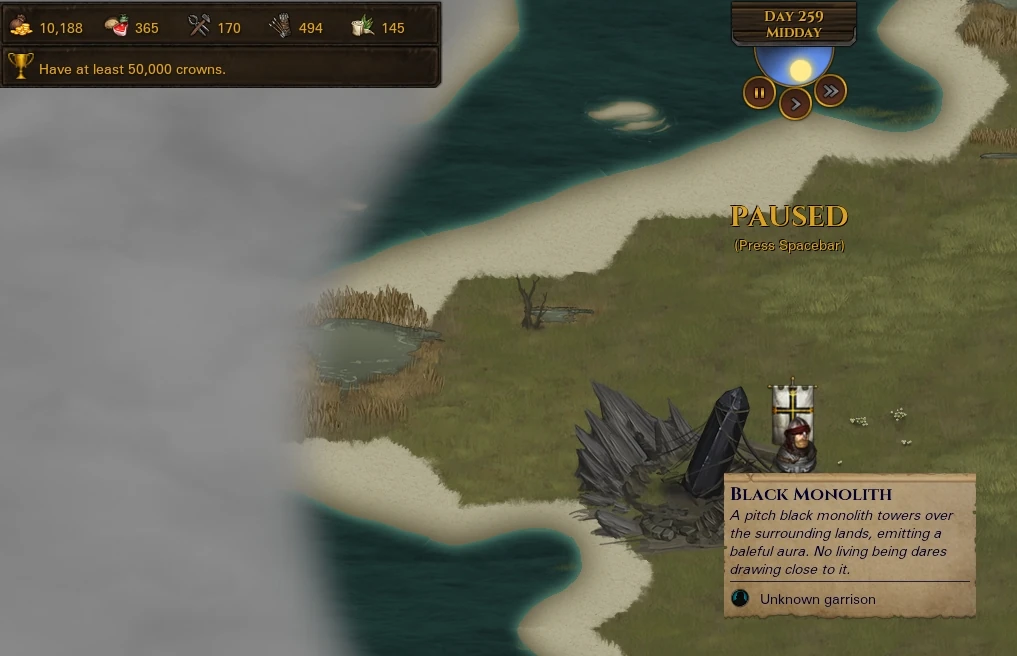

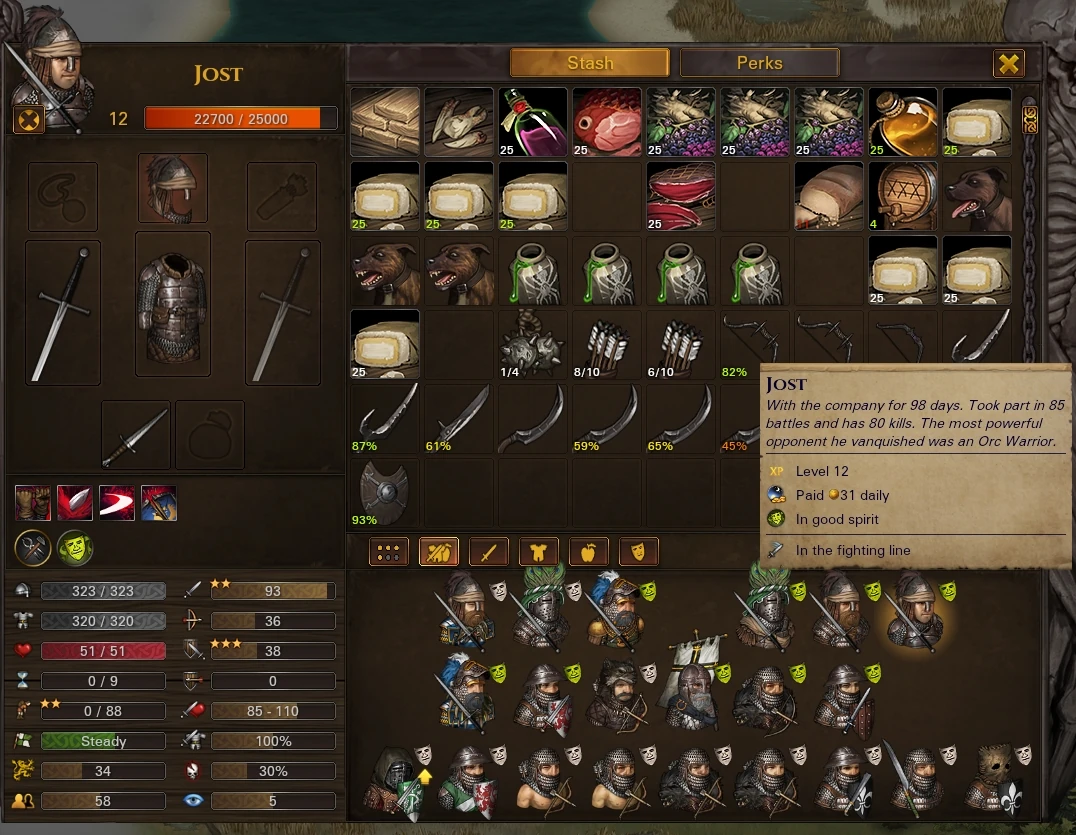
这是队中一人的示例,其他人平均约 14 级。

战斗中使用的阵型。
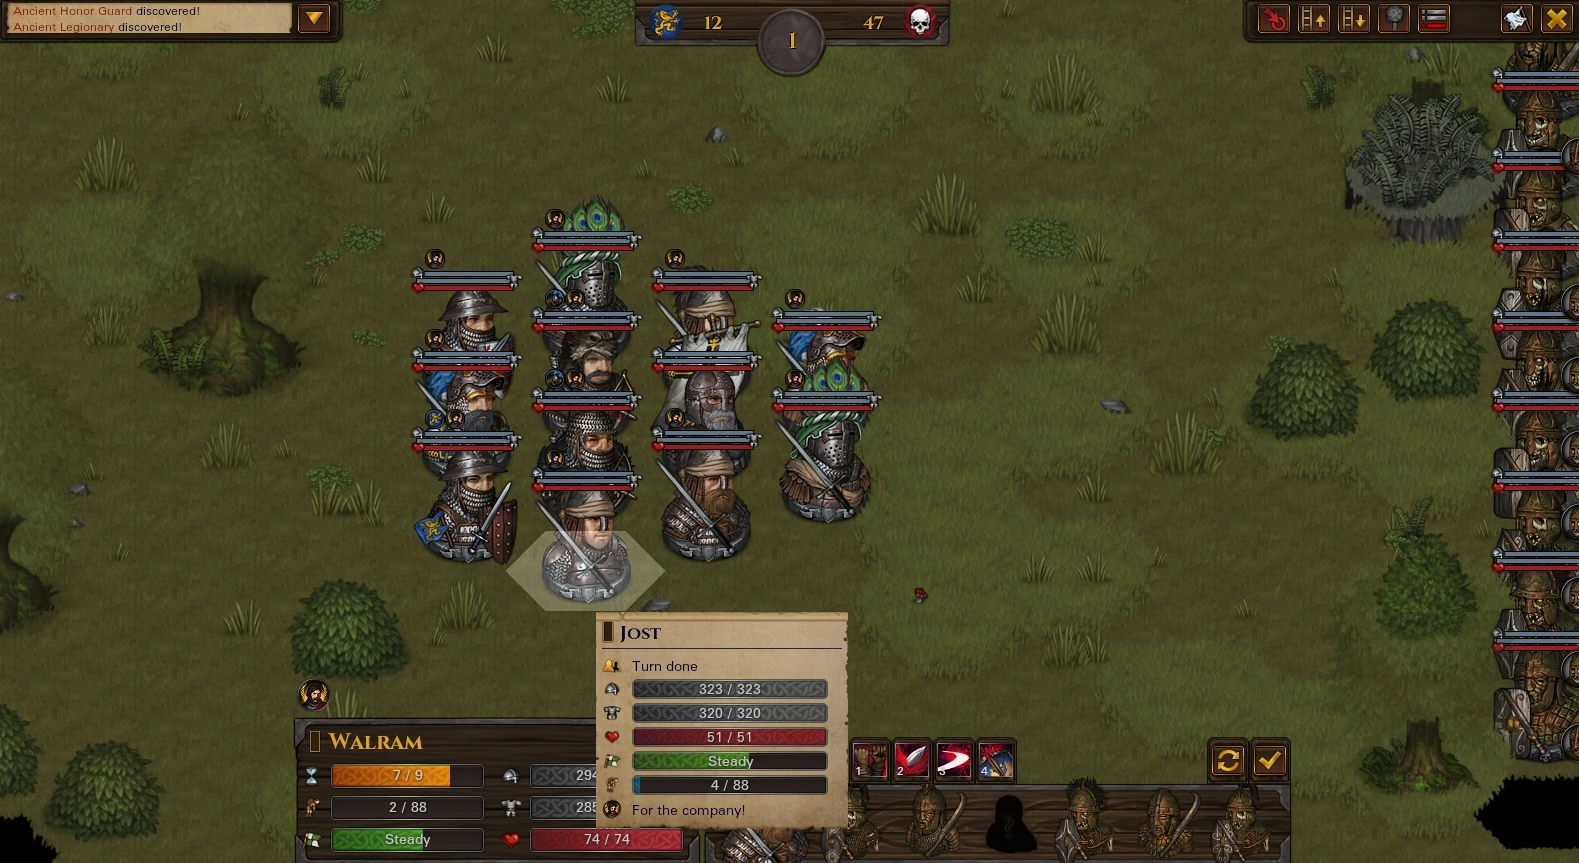

弓手和军士位于最中央。画面右侧的人近战防御最高,越往左越低。而且只有他们可以使用挥击,也就是双手剑第 #3 项攻击;其余人只用劈开,也就是双手剑第 #2 项攻击。
这个阵形的主要目的是保护弓手和军士免受吸血鬼攻击。所有人稳住战线,与吸血鬼接战的人则集中火力消灭它们。弓手用弓,是因为命中率高,而且每回合 2 次射击能叠加压制,方便其他弟兄打中目标。
这个阵形的缺点:
- 不得不硬扛好几回合瘴气。
这种阵型的优点:
- 敌人打不到我的弓手,他们就可以放心向吸血鬼倾泻箭雨。
- 即使队友因祭司的范围恐惧而溃逃,也没有空位可退,因此只会跳过回合,不会在逃跑时被敌人白打,等到下回合军士再次鼓舞就好。
- 敌人出现在你的东侧和北侧。守稳西南方向,就能为之后保留退路。最后我有 4 个人濒死,于是让这 4 个人全部向南撤,其他人负责扫尾。早知道可以用撤退分批削减敌人数就好了,哈哈。
- 所有人都紧靠军士,所以范围恐惧经常失败,鼓舞也几乎每次都能影响全队成员。
吸血鬼死光后,敌军仍在不断瓦解,我便开始向外扩展阵形,直到周围有足够的空地。
用弓手削掉荣誉卫士的护甲。它们几乎不掉生命值,但护甲照样会损失,这就能让我的战士接连击杀,连续触发狂战。
让受伤或生命值低的人向南撤。他们共有 4 人,主要是被瘴气伤到了,而其余敌人正从北面赶来。
扫尾,胜利,拿到一件好盔甲。唯一留下的永久伤势如下。
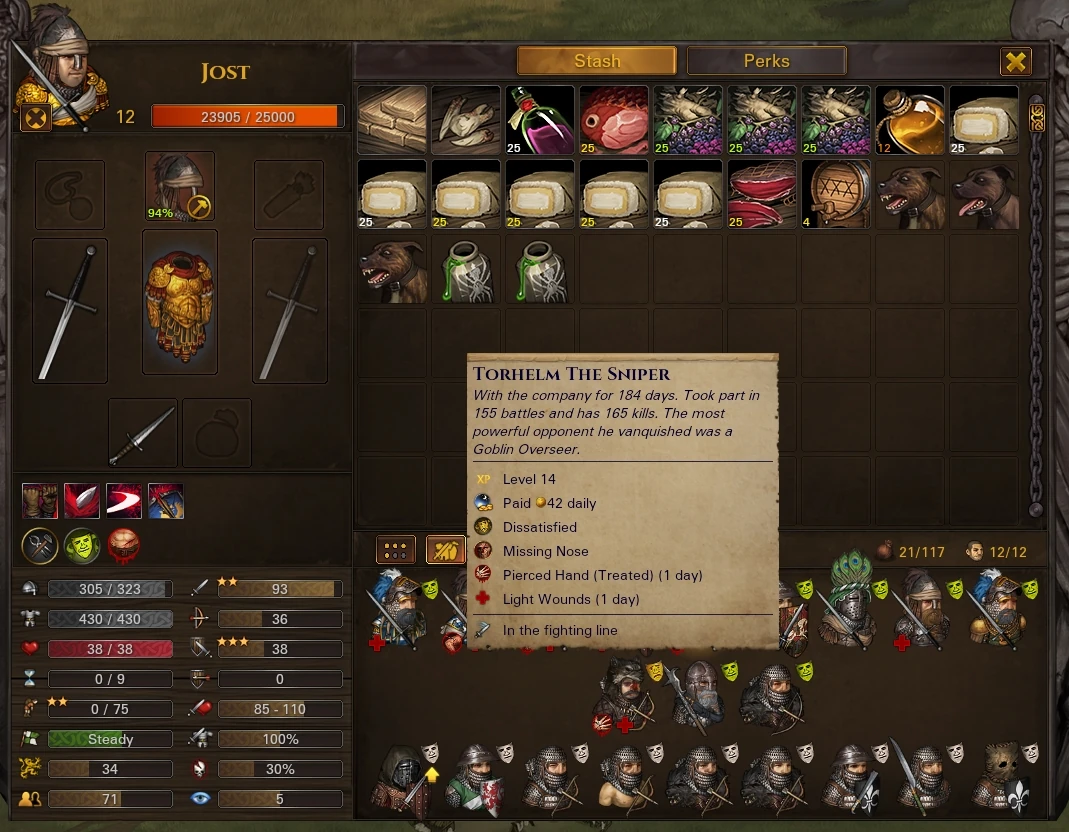

结束
大致就是这样。
抱歉把这篇攻略写得这么长,不过我是教师,实在忍不住解释,哈哈。
如果有笔误或表达不清的地方,也请见谅,英语不是我的母语。请尽管指出,我很乐意修改。
最后,如果还有疑问,请一定提出来。如果你喜欢这篇小攻略,非常、非常感谢!
愿和平常在——还是战争常在吧,毕竟我们还想要更多委托!
Rick。
英文原文
The White Company
The White Company is my third and latest company. Named after the greatest mercenary company ever, this group of misfits lived up to the name having ended the Noble House War and Greenskin Crisis, raided a couple orc bases (warlord & co. Thanks Sarissofoi, your wedge formation rocks!) and on the 259th day raided the Black Monolith without retreating or losing a single man. (Poor Tornhelm the Sniper lost his nose tho).
As a teacher by profession, I can't avoid explaining things as thoroughly as possible. Old habits die hard, I suppose.
Company Set-ups
Early Company:
Early in the game you shouldn't be concerned about epic loot, raiding orc warcamps/goblin cities/Black Monolith. You're there to survive, slowly building up your company. Focus on small contracts and commerce. In time, build up towards something like the following:
- 2-4 hybrid Polearm/Archers.
Aim for the best possible Ranged Atk, Initiative, Ranged Defense and if possible, decent Melee Atk, in that order.
- 4-5 Shield Brothers. (damage sponges)
Aim for the best possible Melee Defense, Fatigue and Melee Atk.
- 2 2handed warriors for flanking and damage.
Go for high Melee Atk, Fatigue and Melee Defense
- 1 Sergeant
High Resolve is mandatory, Fatigue is a must-have and Ranged Defense is essential. So yeah, good luck finding one (mine used to be a beggar)
Lategame Company:
Whenever you have your 12-ish guys and decent armor (200-ish on frontliners is a decent landmark) you can start to shift your company towards a late game composition.
The White Company's lategame was comprised by:
- 1 Sergeant WITH BANNER.
Having a polearm is tempting (and I even fell for that), but the Resolve bonus is too good to pass. Keep the banner, he's not there to DPS
- 2 dedicated archers
Later in the game your 50 melee skill just won't cut it, so throw it off the window and go ham on Ranged Atk, Initiative and Ranged Def.
- 2 Shield Brothers
Archers and Sergeant require bodyguards as other people do their work. They're useless in most levels but mandatory on the hard ones.
- 7 2-handed guys (you'll see screenshots).
These guys are the bread and butter of any lategame company. High Melee Attack and Defense keeps them alive for a very long time. 300/300 plates keep them alive against arrows and crossbows and sky-high fatigue keeps them moving.
How to Fight with this company
In normal missions/ambushes/contracts run forward and slash the enemy to bloody pieces. Keep 1 or 2 tiles between your 2-handed fighters so they can swing away undeterred.
In harder missions/Orc Warcamps, try forming a Wedge Formation. It's the one that looks like a > , placing your archers and sergeant in the center but leave enough space for your 2-handed's swings.
Sarissofoi has a great example of it in this video https://www.youtube.com/watch?v=mxsrPluqLec&t=392s
For the Black Monolith, i'll add a proper chapter with screenshots.
Who are you and what do you do?
As for each class they should be self explanatory but let's go !
- Shield Brother - standard defensive unit. Has no down or upside. Just a guy with a shield and a one-handed weapon protecting his brothers. Later in the game, their best use is to block line of sight to your archers and help keep them alive.
- Sergeant - back-line supporter. He's NOT there to fight or DPS. He's there to keep morale in check.
- Archers/Polearm - early in the game, archers suck and suck HARD. That's why moving them behind the frontline and poking with polearms is a good choice. Becomes irrelevant later on, tho.
- Dedicated Archers: Later in the game, archers are great shooters and rarely ever miss. Inflict as many wounds as possible. They CAN kill enemies, but are there mostly to cripple and/or rout them.
- 2-handed men - THESE are the guys doing the killing. Enemies softened/crippled up by archers equals a reset (berserk perk) making it quick and easy to sweep an entire battlefield.
Shield Brothers
As stated before, these guys are there for protection.
- Stats: Whenever hiring a new guy, aim for Melee Defense, Fatigue and Melee Attack. If possible, try to get a bit of natural ranged defense on him. The guy on the photo has been with the company for 260 days which means he was hired on day 1 !!!
- Perks (explained):
- Student is an amazing perk. Faster exp and you get the perk back at level 11. Absolute godsend, absolute no-brainer.
- Gifted - max rolls on stats, great early boost. No better option on that line anyway.
- Shield Expert - He's called SHIELD brother. I won't dwell on this any further.
- Brawny - Everyone but archers should have it. More fatigue to swing your weapons in battle
- Sword Mastery - Swords have extra hit chance, so i went for them early on. Pick whatever you prefer tho.
- Underdog - Being surrounded is a constant in mercenary life. Get it and you wont die (that easily)
- Berserk - An extra hit whenever I score a kill. Not a bad choice. Not at all. You could also go Nimble here, but this perk is wonderful on goblins.
- Nimble - I don't use these guys to run into enemies. I use them to protect archers. With Nimble and high defenses, they're nearly immortal, since the more fatigue you have in the pool, the greater Nimble's bonus is. Since they sit by the archers and play cards, Nimble is always active.
- Battle Forged - Moar armor = less damage. Go for it. No-brainer.
- Fearsome - if I knew better, I'd have gone for Pathfinder, to be honest. It does help on harder battles tho, especially orcs.
- Killing Frenzy - There's no other option, really. They'll never rush w/o a shield and indomitable drains too much fatigue. Again, Nimble is an option since these guys are more def than offensive, but works quite nicely on goblins, once again.
- Optional perks (not tested myself yet):
- Pathfinder instead of Fearsome. As stated above, if I knew better, I'd probably have done it.
- Steel Brow instead of Killing Frenzy, so no more head-shots.
- Taunt instead of Berserk/Nimble. Could be a godsend when saving archers. Did not test it myself.
- Rotation instead of Nimble/Berserk. Same reason as above.
PoleArchers and Snipers
These guys aren't necessarily KILLERS. They're there to snipe priority targets and then cripple and rout your enemies. Also to soften them up so the other guys can reset off of them.
- Stats: Whenever hiring an archer, focus on Ranged Attack, Initiative and Fatigue. Good Ranged Defense is good, but not that mandatory since they'll have shieldbrothers blocking for them.
- Perks (explained):
- Student. See above.
- Pathfinder. Getting to high ground ASAP and having enough AP to flee enemies is a good option.
- Crippling Strikes. As stated before, the more you cripple enemies, the better. Injuries just like on your brothers, can completely make an enemy useless for that battle.
- Bullseye. The guys you REALLY want to cripple or snipe out are usually behind their own shield brothers. That's where it gets so good. Also reduces chances of hitting your own brothers.
- Dodge. 15% of current initiative as bonus melee AND ranged defense. That guy has 136 initiative. That's + 20 Melee and Ranged Defense. Absolutely amazing !
- Bow Mastery: Bows. Bows bows bows !!! Crossbows do deal more damage per shot and all that, but what you REALLY want is the synergy between shooting twice per round + fearsome + crippling strikes + Overwhelm. We'll get there.
- Overwhelm: Amazing perk. If they attack after you, you get -10% Ranged AND melee defense per shot fired HIT or MISS !!! If you invest on Initiative, you'll "always" go first. -20% battle usefulness for your enemies.
- Footwork: Sometimes you'll mess up. Sometimes you'll be knocked back. Then you take a quick step, get out of melee range and re-establish your line.
- Berserk: Godly especially versus goblins. Extra shots = either extra kill or extra injury. At the very least, extra overwhelm stack.
- Fearsome: Make them rout ! You're not paid to kill every single enemy. Leave one or two alive so they can tell stories about the evil men who devour little children if they misbehave. Making them flee is how legends are born! Also, lowers their combat effectiveness and your brothers can get extra hits whenever enemies flee.
- Killing Frenzy: More damage whenever you score a kill. I do like it, but I question myself if Quick Hands wouldn't be better. Most fights I don't even get to spend a full quiver, but the hardest ones do. Could be useful in those, for every turn/shot counts.
- Optional Perks:
- Quick Hands instead of Killing Frenzy. Reasons stated above.
Saaaaaaarge !
Sarges aren't supposed to fight. Like every good boss, they are amazing at giving orders and awful at executing them. I know some of you will relate. LOL
- Stats: This guy is there to keep morale up. Period. Don't fall for the polearm trap, get the extra resolve with the banner. In order to keep morale up this guy will need: Stupid high Resolve, endgame he'll need quite a high fatigue and Ranged Defense since he should never go melee.
Do NOT follow the stats on the picture !!! I goofed up on this guy and am leveling a new one. Will edit this page someday.
- Perks:
- Student. See Shield bearers
- Pathfinder. So you can move to needing allies more quickly and Rally them
- Fortified Mind. Main stat = Resolve. This gives 25% extra Resolve. Duh.
- Gifted. Max stat rolls. Hell yeah, more resolve !
- Anticipation: The farther they are, the more Ranged Defense you get. Amazing for staying alive.
- Brawny: Get him heavy armor, he'll never die and with Brawny he won't get as tired.
- Rally The Troops: This is what MAKES a Sergeant. If he doesn't have THIS perk, he shouldn't carry the banner.
- Polearm Mastery: Because why not?! I'd maybe swap this for something like Colossus. Nothing could be worse than a dead sergeant.
- Quick Step: If the enemy ever closes in on the sarge, two things are certain: 1. you goofed up somewhere; 2. you gotta get him out ASAP.
- Berserk: I did goof it up in him. Berserk is completely useless (at least the way I USE him, not the way I BUILT him). Would probably swap this one for Nimble.
- Battle Forged: Since he uses heavy armor... less damage received. This is THE guy who can't ever die. Ever. Whatever it takes.
- Optional Perks:
- Sergeants are too serious to leave any options. "Do as you're told or I'll have your skin flayed off you farkin lowborn lazy ass coward! Yarrrrgh! " - Sir Geofram, The Sarge, Apr. 2017
2 Handed badass
Now THESE guys are awesome. They're the ones pulling the real weight and dealing massive AoE all over the place. Try leaving a tile or two between each of them and the enemy will cripple in those holes and get slaughtered.
(Do note, in the picture how many kills and days this guy has. And he's not my best kill-to-day ratio, I chose him for the high fatigue and awesome beard)
- Stats: In order to chop heads off, you need strength. High Melee skills, fatigue and good melee defense. This is what you're looking for. Ranged defense is a good extra, but not mandatory.
<a class="w-mw-file-description w-image" href="https://static.wikia.nocookie.net/battlebrothers/images/b/b4/Twohandedsoldier.jpg/revision/latest?cb=20170414102821"><img alt="Twohandedsoldier" class="w-thumbimage" data-image-key="Twohandedsoldier.jpg" data-image-name="Twohandedsoldier.jpg" data-relevant="1" data-src="https://static.wikia.nocookie.net/battlebrothers/images/b/b4/Twohandedsoldier.jpg/revision/latest/scale-to-width-down/400?cb=20170414102821" decoding="async" height="247" loading="lazy" src="/wiki/media/850c6899097428e6fe3adb390910c1230093971ab5c733b50df99c71b0f72e2d.webp" title="Twohandedsoldier.jpg" width="400"/></a>
- Perks:
- Student. No brainer. Best perk in the game.
- Pathfinder: You'll see why when you fight in swamps or snow. Trust me, get this.
- Gifted: Perfect rolls for more Melee Attack, Fatigue and Defense? Shut up and take my perk ! (if you REALLY want, you can skip this for Executioner to further capitalize on your archers, but I'd still keep this one)
- Brawny: mandatory. Heavy armor is heavy indeed. This perk helps with that.
- Sword Mastery: Weapon of choice mastery, really. But I like swords. Lighter than the other 2 handed stuff and this mastery gives extra chance to hit. And scoring a hit is essential because ....
- Reach Advantage: Whenever you score a hit, you get a stack of Reach Advantage, increasing melee defense by 20% per stack up to 6 stacks. In reality you'll get around 3. That guy has 48 Melee def. 48 + 60% = 77. Enemies rarely score a hit on him.
- Underdog: You don't want to get hit, remember? Underdog helps with that. Being surrounded has no penalty (and you WANT to be surrounded)
- Berserk: Brilliant when it procs. And your archers can set that up real nice. Whenever you score a kill you can basically attack again. Lovely skill, I'd say it's a must-have.
- Battle Forged: More armor = less damage received. So you barely get hit and when you do, it's like they punched a brick wall. Hell yeah!
- Killing Frenzy: Extra 25% damage for two turns when he kills someone. And he's there TO kill someone. Amazing perk to have especially later in the game.
- Fearsome: I love making them rout. It's good, it's useful but dead allies have the same effect on enemies so maybe, just maybe, you can change it up for Executioner, Steel Brow or even Recovery.
- Optional perks:
- Executioner could be a good perk to capitalize even more on your archers;
- Steel Brow could make them nearly immune to head damage. I wouldn't go there, to be honest.
- Recovery. Against undead hordes this perk would be incredible. The Black Monolith would've been easier (more like less hard) if I had this instead of Fearsome, since Undeads don't ever rout.
- Colossus. You barely get hit, when you do it deals minor damage.... BUT well, what if you could also be immune to injuries? That's basically Colossus on a 2-handed dude.
Equipment:
Don't fight naked. That's kinda all there is to it.
On a serious note tho, equipment is pretty straight forward.
Shield Brothers: heavy armor + helmet + weapon of choice + shield. (kite shields are better vs goblins, Heater Shields are better on a daily basis). Have DAGGERS as your backup weapon.
Archers: Light armor. Helmet that doesn't mess up their vision. Level a couple tailors (I had 4 early on), they'll eventually make wolf armors and that's all you'll be needing. Also, bows. bows bows bows. Bows are SO much better than crossbows (xbows are better early on tho, since they have extra chance to hit)
Sargeant: heavy armor + banner + heavy helmet. Never engage in battle, but when/if it happens, you gotta survive.
2-handed badass: Heavy armor, Heavy Helmet, Heavy underwear if possible. 2handed weapon of choice. AoE to victory. Have DAGGERS as your backup weapons.
The (damned) Black Monolith
The Black Monolith is a superlategame raid you can make and get a SEXY piece of equipment out of... If you can survive the 47 undeads, being 4 priests (AoE fear and AoE poison), several vampires (I believe around 6-8?) and the stupidly large horde of heavy armored and tower-shielded Ancient Guards.
I did explain how to use The White Company to achieve success, but this raid deserves more in-depth thought.
Screenshots proving I did it and didn't lose a man:
1. Pre-battle. Day 259.
<a class="w-mw-file-description w-image" href="https://static.wikia.nocookie.net/battlebrothers/images/6/60/Black_Mono_1.jpeg/revision/latest?cb=20170414105501"><img alt="Black Mono 1" class="w-thumbimage" data-image-key="Black_Mono_1.jpeg" data-image-name="Black Mono 1.jpeg" data-relevant="1" data-src="https://static.wikia.nocookie.net/battlebrothers/images/6/60/Black_Mono_1.jpeg/revision/latest/scale-to-width-down/400?cb=20170414105501" decoding="async" height="258" loading="lazy" src="/wiki/media/45f7f829fdc25e2cf46e4b50a67950572acb44d1b2111ab6eb468db79dc43dd0.webp" title="Black Mono 1.jpeg" width="400"/></a>
Example of one guy in the party. Others are average lvl14.
<a class="w-mw-file-description w-image" href="https://static.wikia.nocookie.net/battlebrothers/images/2/2b/Black_Mono_2.jpeg/revision/latest?cb=20170414105526"><img alt="Black Mono 2" class="w-thumbimage" data-image-key="Black_Mono_2.jpeg" data-image-name="Black Mono 2.jpeg" data-relevant="1" data-src="https://static.wikia.nocookie.net/battlebrothers/images/2/2b/Black_Mono_2.jpeg/revision/latest/scale-to-width-down/400?cb=20170414105526" decoding="async" height="310" loading="lazy" src="/wiki/media/3738ec669928200b52c8b6c13878d621cec4dced7ce6ae466feb49d2ec96cfba.webp" title="Black Mono 2.jpeg" width="400"/></a>
Formation used during the battle.
<a class="w-mw-file-description w-image" href="https://static.wikia.nocookie.net/battlebrothers/images/3/3c/Black_Mono_3.jpeg/revision/latest?cb=20170414105551"><img alt="Black Mono 3" class="w-thumbimage" data-image-key="Black_Mono_3.jpeg" data-image-name="Black Mono 3.jpeg" data-relevant="1" data-src="https://static.wikia.nocookie.net/battlebrothers/images/3/3c/Black_Mono_3.jpeg/revision/latest/scale-to-width-down/400?cb=20170414105551" decoding="async" height="219" loading="lazy" src="/wiki/media/b39515eef575a936d2851ba48161c430210ddc94ac76e0d84212f3048a4fee9a.webp" title="Black Mono 3.jpeg" width="400"/></a>
Archers and Sergeant in the very center. Guys on the RIGHT hand on the screen have the highest Melee Defense on the Company. As you get left it gets lower. Also, they're the only ones allowed to Swing (2h sword attack #3), the other guys only used Split (2h sword attack #2).
This formation had as it's main objective to protect my archers and Sargeant from the Vampires. Everybody held the line while those engaged with vampires focused them hard. Archers are using bows because of high hit chance and 2 shots + overwhelm, making it easier for other brothers to score their own hits.
Downside of this formation:
- Had to endure several rounds of Miasma.
Pros of this formation:
- Impossible to hit my archers, so they can rain arrows on vampires.
- If ally routs (AoE fear Priests have) there's no empty space for them to run so they just skip turn (and don't get free-hit by enemies) until Sergeant can Rally again next turn.
- Enemies spawn East and North of you. Securing a strong Southwest can guarantee an escape route later on. I had 4 guys barely surviving in the very end, ran all 4 of them south while the rest cleaned up the fight. (wish I knew about retreating to thin numbers lol)
- Everybody is super-close to the Sergeant, so AoE fear fails often and Rally works almost every time on every member of the Company.
After their vampires died and the enemy army was still collapsing I began to spread the formation outwards until I had a clear enough field.
Used archers to strip Honor Guards from their armors (their health bars are nearly immune, their armor are not) setting up Berserk-chains for my fighters.
Ran south with injured/low health characters (4 of them, especially due to Miasma) since the rest of the enemies were coming from the north.
Clean up. Victory. Awesome armor and only (permanent) injury suffered below.
<a class="w-mw-file-description w-image" href="https://static.wikia.nocookie.net/battlebrothers/images/d/d6/Black_Mono_4.jpeg/revision/latest?cb=20170414105616"><img alt="Black Mono 4" class="w-thumbimage" data-image-key="Black_Mono_4.jpeg" data-image-name="Black Mono 4.jpeg" data-relevant="1" data-src="https://static.wikia.nocookie.net/battlebrothers/images/d/d6/Black_Mono_4.jpeg/revision/latest/scale-to-width-down/400?cb=20170414105616" decoding="async" height="311" loading="lazy" src="/wiki/media/d7a03e2fb78ca5cb684d59a1a155708f2233a827eaab817561956f8304cad837.webp" title="Black Mono 4.jpeg" width="400"/></a>
The End
And that's about it.
I do apologize if this guide got super big, but as a teacher I can't avoid explaining things. lol
Also, apologies if there are any typos or if something isn't clear. English is not my native language. Please do point out and I'll gladly correct it.
And finally, if you have any doubts, PLEASE do ask and if you liked this little guide, thank you very, very much !
Peace (or war, since we want more and more contracts!),
Rick.